Continuous Integration on the Force.com platform using Git, Bamboo, & JIRA
When we develop applications on the Force.com platform we perform a lot of activities to create, test and ship our code. We repeatedly carry out tasks like Run All Tests to ensure that the code that we have just committed to the repository does not break the build. This may involve (repeatedly) deploying your code to a QA org, and running all tests on that org. These activities are not only time consuming but also repetitive and soon become boring as you re-iterate this cycle for every code commit.
I am a big proponent of automating developer workflows to improve productivity and to reduce the cognitive effort required to develop and ship software by automating repetitive tasks where possible. Techniques such as Automated testing, Continuous Integration, and Continuous Deploy enable Continuous Delivery - a desirable model to deliver software in the modern Agile world.
Thankfully, it is possible to streamline Force.com development by automating almost all of these tasks, and this article will describe one way of adding Continuous Integration to your dev setup using Git, JIRA, and Bamboo. This article assumes that the reader has some familiarity with these technologies. We will be using Bitbucket to host our Git repository
Follow these steps to set up Continuous Integration with Git, JIRA and Bamboo.
Step 1: Setup your Git repository on Bitbucket
- Log into your Bitbucket account, and create a new repository.
- Follow the instructions in Bitbucket to clone the repository on your machine.
- Add some code to your local repository, and push the commit to the bitbucket (remote origin) repository.
I chose Bitbucket because it has inbuilt hooks to integrate with JIRA.
Step 2: Associate your JIRA project with Bamboo
To complete this step you will need a Bamboo feature license in JIRA.
- Create a new JIRA project (if you don’t already have one).
- After you have set up the project, click on “Administer Project” to go to the project administration page.
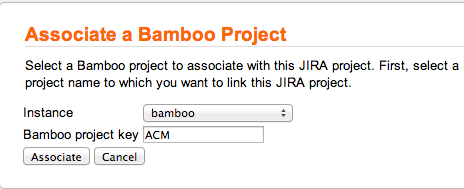
- Under the Settings section, select the “Bamboo Project”. You will be directed to the “Associate a Bamboo Project” page where you can assign an “instance” and enter the Bamboo project key.
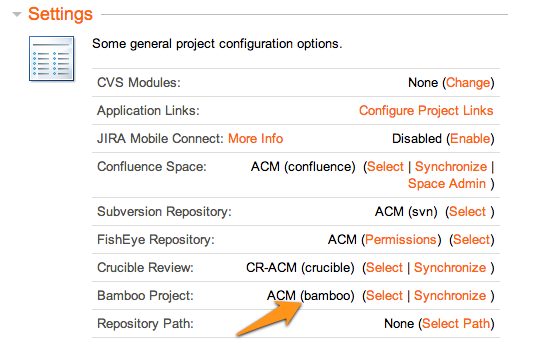
Basically, this step links your JIRA project with your Bamboo project.
Step 3: Link Bitbucket to JIRA
In this step you will link the Bitbucket repository to the the JIRA project. This means that every time you commit some code to the Git repository and insert the JIRA task ticket number in the commit comment, the commit information will be displayed in the Commits tab under the Activity section.
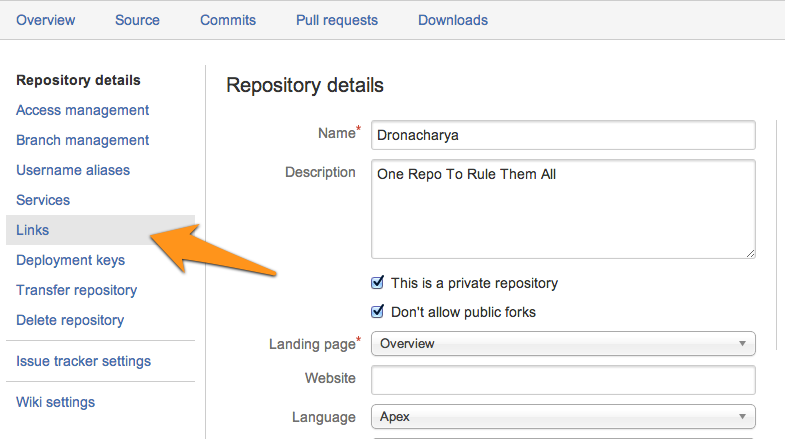
- Go to your repository settings in Bitbucket and click on Links.
- Then, click on the Atlassian Jira icon under “Add a new link”, and enter following details.
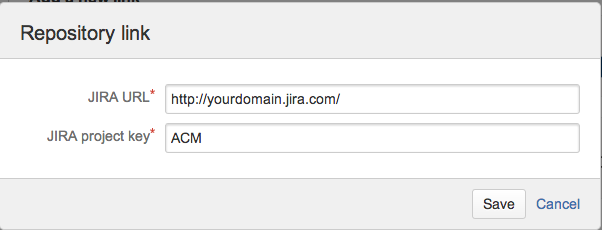
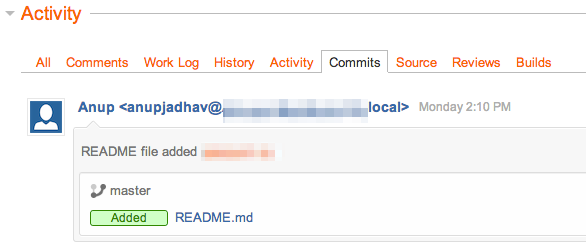
- Bitbucket is now linked to JIRA. If you commit your changes with the JIRA ticket number, your commits will appear against the JIRA ticket in the Commits tab under the Activity section.
Step 4: Setup Bamboo in JIRA
In this step we configure Bamboo and create a build Plan that Bamboo will execute to checkout the code from BitBucket and deploy it to the CI org and Run All Tests.
- Log into JIRA again, and click on the Atlassian Bamboo Admin link in the main settings drop down menu.

- On the Atlassian Bamboo Admin page, configure Elastic Bamboo by adding the AWS Access Key ID and updating Elastic Bamboo Global Settings. Read the Bamboo documentation for more information on how to set up Elastic Bamboo. Setting up AWS instances is out of scope of this article.
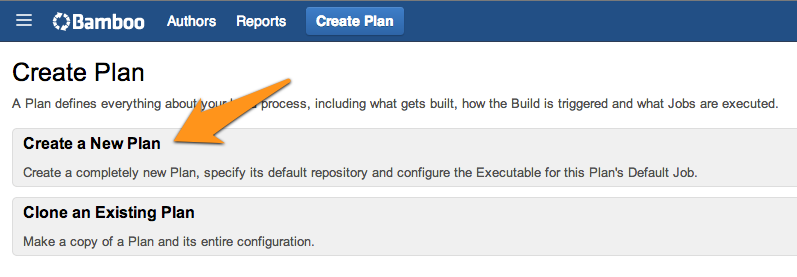
- Once Elastic Bamboo is configured and linked to AWS instance(s), you are now ready to create a Plan for your project.
- A plan defines everything about your build process, including what gets built, how the Build is triggered and what jobs are executed.
- Click on the Create Plan button to go to the Plan wizard page, and then click on the “Create a New Plan” link.

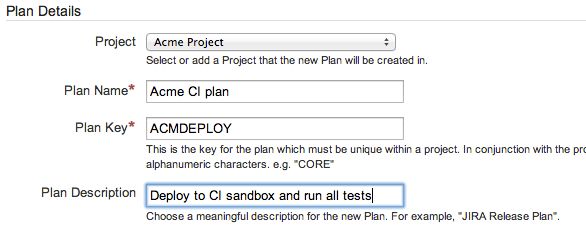
- Enter Plan details like Plan Name and Plan Key. If the project does not exist in the drop down list then select the new project option and enter the Project Name and Key.
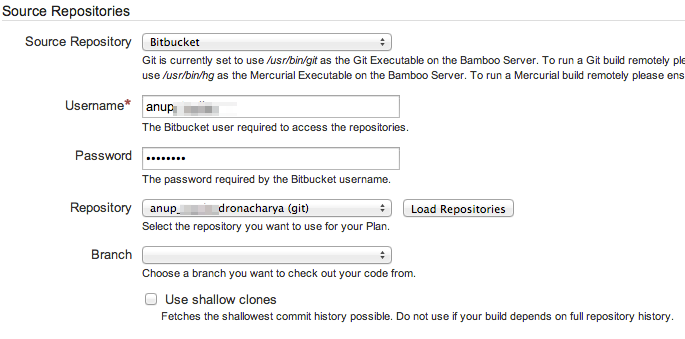
- Enter Source Repository information
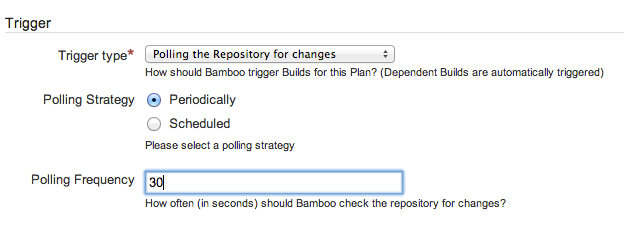
- Enter Trigger details like Trigger type, Polling Strategy, and Polling Frequency. This determines how and when the job should poll the repository. In this case we are requesting the job to poll the repository for changes every 30 sec.
- Complete the process by clicking on “Configure Tasks” which takes you to the Configure Tasks wizard page where you can add tasks to the plan that will be executed in the desired order.
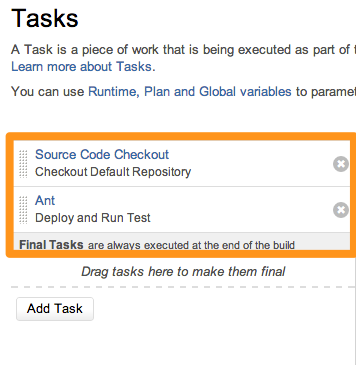
- You should now see the Source Code Checkout task automatically added for you. Click Add Task to add the build task.
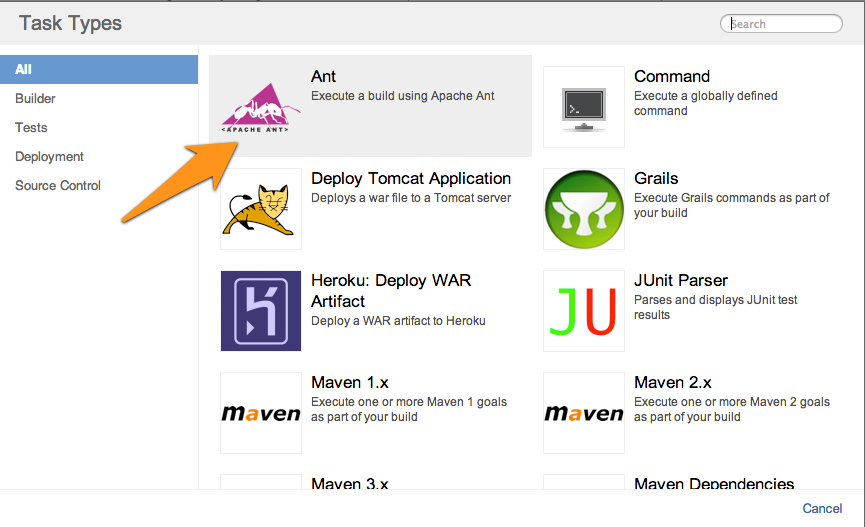
- Since we will be using the Force.com migration toolkit which is based on Ant, you need to add the Ant task from the list.
- Enter the Ant Task details as shown below. The Target is the ant task that will be run by this job, and the Build File is the location of the build.xml file stored in the repository.
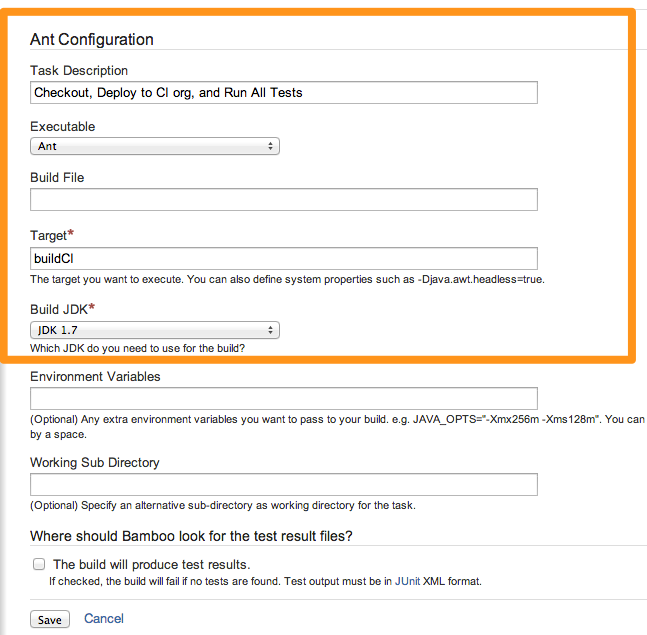
[EDIT: One of the readers rightly pointed out that the “Build File” entry above should be build/build.xml, and “Target” entry should be deployPackaged instead of buildCI]
We have now created a Plan in Bamboo that will checkout the code from our Bitbucket repository when it changes (i.e. when we commit and push something to the repository), run the ant task that will deploy the code to the CI org and runs all tests. The CI org details are listed in the build.properties file and deploy and run all tasks are defined in the build.xml file.
Step 5: Add build.properties and build.xml to the repository
You have setup a Bitbucket repository, linked it to a JIRA project, and created a Plan in Bamboo that checks out the code from Bitbucket and added an ant task to run the build.xml file. The next step is obviously to write the build.xml file and add it to the repository.
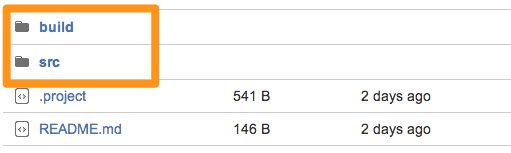
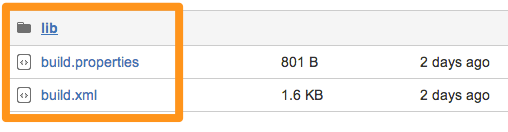
Add a buid directory to your root project directory that will hold the build.xml and related build.properties and Migration toolkit jar file(inside lib folder) as shown below. This structure will keep the src and the top-most folder clean.

The build.properties file contains your username, password, server url for the CI org.
# The password is all that should be changed in normal circumstances
sf.username = <username>
sf.password = <password>

# Setup polling params
sf.maxPoll = 500
sf.maxWaitMillis = 5000

# More optional params
# sf.pkgName = <Insert comma separated package names to be retrieved>
# sf.zipFile = <Insert path of the zipfile to be retrieved>
# sf.metadataType = <Insert metadata type name for which listMetadata or bulkRetrieve operations are to be performed>

sf.serverurl = https://login.salesforce.com

# If your network requires an HTTP proxy, see http://ant.apache.org/manual/proxy.html for configuration.
The build.xml file contains the target and tasks which will deploy the code to a CI org using the credentials from build.properties, and run all tests.
<project name="ACM" basedir=".." xmlns:sf="antlib:com.salesforce">

    <taskdef uri="antlib:com.salesforce"
            resource="com/salesforce/antlib.xml"
            classpath="${basedir}/build/lib/ant-salesforce.jar"/>

  <property file="${basedir}/build/build.properties"/>
  <property environment="env"/>

  <property name="lib.dir" value="${basedir}/lib" />
  <property name="src.dir" value="${basedir}/src" />

    <target name="cleanAfter" depends="deployPackaged">
        <echo level="info">Clean Down Workspace Ready for Next Build</echo>
        <delete dir="${basedir}" failonerror="false" />
        <delete includeEmptyDirs="true" failonerror="false">
          <fileset dir="${basedir}"/>
        </delete>
    </target>

    <target name="deployPackaged">
      <echo level="info">Perform a Deploy transaction</echo>
      <zip destfile="${src.dir}/batch.zip"
           basedir="${src.dir}"
                 includes="applications/*.*, classes/*.*, staticresources/*.*,documents/**/*.*, email/**/*.*, labels/*.*, objects/*.*, workflows/*.*, pages/*.*, components/*.*, tabs/*.*, letterhead/*.*, triggers/*.*, layouts/*.*, reports/**/*.*, profiles/*.*, package.xml"
      />

      <sf:deploy
          username="${sf.username}"
          password="${sf.password}"
          serverurl="${sf.serverurl}"
          maxPoll="${sf.maxPoll}" pollWaitMillis="${sf.maxWaitMillis}"
          zipFile="${src.dir}/batch.zip"
          runalltests="true" >
      </sf:deploy>
  </target>
</project>
This is a very basic build.xml file, but you can extend it to add builds for different orgs, and can add tasks that trigger other tests like Selenium scripts. If you now run the Bamboo Task from JIRA it should run your build, and if it is successful, the build run info will also be listed against the JIRA ticket that was used in the latest code commit in the Build tab under the Activity setion.
You can also (optionally) enable notification on your Bamboo Plan inside JIRA to send you or a group of users an email whenever a build succeeds or fails.
Let me know in the comments if you want me to elaborate or explain a step in more detail, and I’ll be more than happy to help.
Tweetcomments powered by Disqus